|
General
•
Download
•
HTML Generation
•
Customization
•
Examples
General
SimpleViewer is a free flash application by Airtight Interactive. It can be used as stand-alone product to show your images on a website. The SimpleViewer XML template offers a convenient way to use Adobe Photoshop CS/CS2 for generating the images and the XML file that controls the gallery.
Airtight Interactive's Terms Of Use
SimpleViewer may be used in any kinds of personal and/or commercial projects. It may not be redistributed or resold to other companies or third parties.
The same terms apply to the Photoshop template by EOS4you. It is also free of charge. It can be used with Photoshop CS or CS2.
Version History:
Oct. 19th 2006 -
Fix for Firefox browser.
Sep. 20th 2006 -
Upgraded to SimpleViewer v1.8, header part added and better Flash detection script.
Jan. 16th 2006 -
Also works with non JPG images, no XML file used and better Flash detection script.
Jan. 8th 2006 -
First version released.
Download and Install the Template
First you have to download the SimpleViewer template, then extract the ZIP file. Locate the Adobe Photoshop application directory and move the new folder called "SimpleViewer" into the Presets\Web Photo Gallery folder. The template will then appear as choice within the Web Photo Gallery interface. Example for a Windows PC:
C:\Program Files\Adobe\Adobe Photoshop CS2\Presets\Web Photo Gallery\SimpleViewer\
HTML generation tips
The installation is now completed. Before you generate a new gallery you have to do two things. First create a new output directory for your gallery. It can be anywhere on your local disk. In the example below the output directory is called "event01":
C:\www\galleries\event01\
Then go to the SimpleViewer template folder and open the directory "copy_these_files". Copy all files within that folder (not the .htm template files) into the newly created output directory ("event01" in the example above). This step is essential, the gallery won't work without these files. Unfortunately Photoshop does not do this automatically like all other applications.
Next comes the decision wether you want to start the gallery using Bridge or Photoshop. Adobe Bridge is a file browser that comes with CS2 (or as stand-alone product) and has many advantages but it may slow down your computer due to the additional memory usage. In Photoshop you can only build a gallery from all images in a directory while Bridge lets you select and sort the images before the generation process. If you select one or more images, only these will appear in your web gallery. If no image is selected the gallery will contain all images of the shown folder.
Instructions for Bridge:
Tools → Photoshop → Web Photo Gallery...
Instructions for Photoshop:
File → Automate... → Web Photo Gallery....
After that the Web Photo Gallery dialog appears:
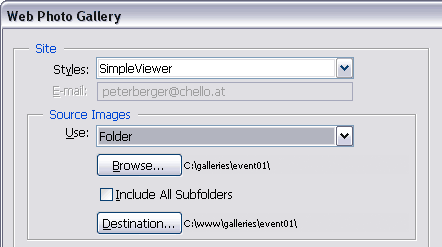
Choose "SimpleViewer" from the list of Styles. Then click on the Destination button and locate the newly created output folder, called "event01".
Gallery Options
Underneath you can see a dropdown list with various Options. Select one after the other and read the associated explanations below. The first one is called General and can be ignored.
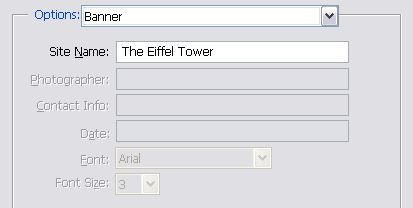
Next one is Banner. Here you can enter the Site Name which will be used as gallery title and will show up in the window frame and the page header. All other fields are greyed out.
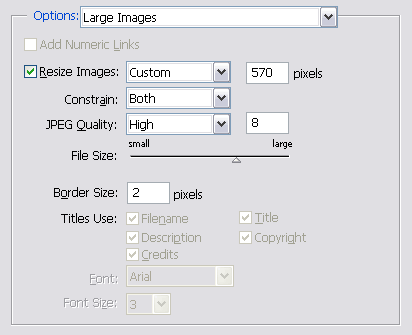
In the Large Images option dialogue you can set the size and quality of the web images. The settings shown below are good for a start but if you opt for highest quality you can also resize the images with a action beforehand (together with a watermark and USM) and disable the resize feature here. Furthermore you can define the Border Size in pixels.
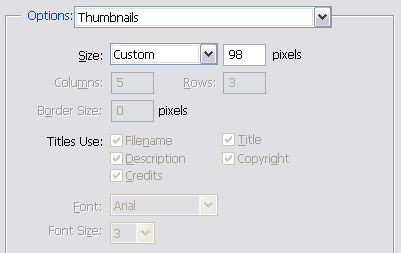
In the options for Thumbnails you can set the thumbnail size. SimpleViewer v1.8 only displays one size and resizes all thumbnails images to fit in the square. It is recommended to set a size of 98 pixels so that the images are left untouched by SimpleViewer. All other fields are greyed out. The thumbnail layout (columns x rows) can be set in the source code (more on that later) but not here in this dialog.
The settings for Custom Colors offer three different color variables:
• Background: background color for the main area
• Banner: background color for the header part
• Text: text color for the title in the header
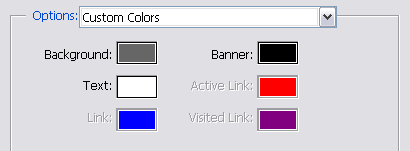
More color options can be set in the source code (see below).
The last options is Security. Here you can define a text that will be used as a watermark in your pictures. The result can be pretty ugly because there is no outline or background color. That means dark text on a dark part of your image will be unreadable. I recommend to use a Photoshop action for watermarking instead.
That's it. Hit the OK button and watch the images being resized. When the gallery is finished your default browser will be opened and the gallery shows up.
Customization
Most things can be defined in the Options dialogs (explained above) but you can also edit the source code directly. There are two files available for further customization. Both are located in the template folder. The first one is "FrameSet.htm". Open it in a text editor (e.g. notepad). If you like to suppress the header part then delete this line of code:
<h1>%TITLE%</h1>
The second file for customization is "IndexPage.htm". It contains a bunch of SimpleViewer variables which are explained on the SimpleViewer website. Here you can define more colors, layout and some more.
For changes that should affect only one gallery you can also edit the files in the output folder instead of the template folder. Just be careful because a regeneration will destroy your changes.
For more information please read the SimpleViewer FAQ.
Examples
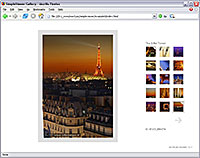
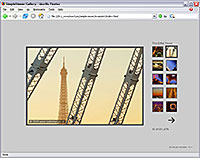
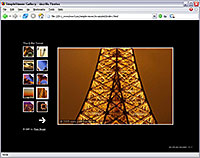
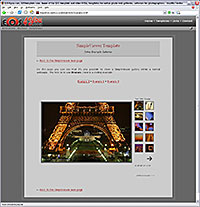
All example galleries show the same 25 photos of the Eiffel Tower in Paris.
 View example 1 in a new window.
The first gallery shows the images on a light grey background with the navigation to the right. When you move the mouse over the thumbnails the image ID (filename without extension) appears below.
 View example 2 in a new window.
The second gallery shows a black background with the thumbnails on the left side. Below them there is a copyright notice with a clickable link to the photographer's homepage. This can also be used as a "back" link.
View example 3 in a new window.
The third gallery has a white background and three rows of thumbnail images to the right. Resize the window with your mouse and see how the main image gets resized when window gets smaller! This is done by SimpleViewer and may degrade the image quality. On the other side it's possible to show large images on bigger screens without excluding people with smaller screens from viewing your photos.
 It's also possible to show a SimpleViewer gallery within an existing web page. Read more...
Top
|