|
General
•
Installation
•
First Gallery
•
EOS Settings
•
Part 2 »
General
The EOS HTML template can be used with JAlbum (version 5.1 or higher). For the following description version 7.0.3 had been used. Before you start using the EOS template you should get comfortable in generating HTML galleries with JAlbum. Read the help files or read the user manual online.
If you have a specific question regarding the application itself (not EOS related) then please post to the JAlbum support forum. It is monitored by the developer, David Ekholm.
Installing the Template
Note that JAlbum comes with several templates which are called "skins". There is no difference between a skin and a template, it's just another word for the same thing.
The installation requires two steps and is very simple. All you have to do is to download two ZIP files and extract their content in the right place.
The files are named eos_common_v25.zip and eos_v25_jalbum.zip and can be downloaded from the Yahoo! group's Files section. It's important that their folder structure is still intact after the extraction!
Common Files
Now you have two folders named "galleries" and "EOS". The first one is your EOS project folder and can be moved to wherever you like. It only contains the "eoscommon" folder. Later it will be the place where all your web galleries reside. There is more information if you click the link above but it is not essential that you read it before you create your first gallery. Example setup:
C:\www\galleries\
Template Files
The next step is to install the "EOS" folder. Locate the JAlbum installation directory and move the "EOS" folder into the subfolder templates. The next time you open the skin selection menu "EOS" will be available. Example path:
C:\Program Files\JAlbum7.0\skins\EOS\
Note that you can rename the EOS folder without affecting it's functionality. That means you can install multiple versions of the EOS template if you like!
Template files are files which get scanned by the HTML generator. Tokens get replaced, Java commands are processed and rules will be applied to build a complete HTML gallery. There exists only one copy per template file in the template folder. However during the HTML generation process the image template gets applied to every image in your gallery, resulting in multiple image files (one per image) in the output folder.
Template
File Type
| File name in the
Template Folder
| File name(s) in
Output Folder
| Amount
|
| frame
| frameset.htt
| index.html
| 1
|
| index
| index.htt
| index-frame.html
| 1 |
| image
| slide.htt
| slides/<image-name>.html
| one per
image
|
Furthermore all files in the "res_eos" subfolder get copied unchanged to the output folder.
Your first Gallery
The installation is now completed and you can generate your first gallery. First you must select the EOS skin from the drop downlist. If you do not find it in the list then close JAlbum and reopen it. If you still don't see it then check if the "EOS" folder is in the correct directory. Note that version 7 installs in a new folder. So you may have two JAlbum installations on your system.
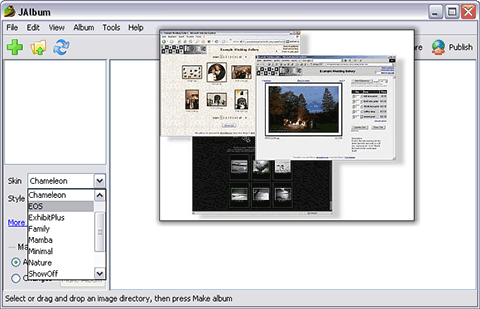
Note that it is not possible to select different CSS files from the Style menu. In order the change the style you have to edit the CSS file in the eoscommon folder. There are predefined styles available for download from the Yahoo group which can be easily applied.

The following paragraphs explain the necessary steps to create a gallery with the default settings. Click on the Settings button to open the window.
General Settings
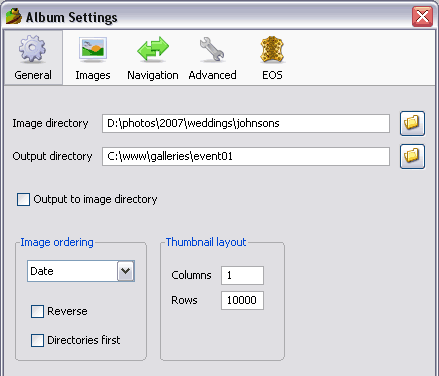
First choose the correct Image directory (also called source or input folder). That is the place where your original images are.
The path for the Output directory is very important. Enter your EOS project folder plus a gallery folder name of your choice. In our example that would be:
C:\www\galleries\event01
In other words, "C:\www\galleries" is your EOS project path, where the "eoscommon" folder sits and all your web galleries as well.
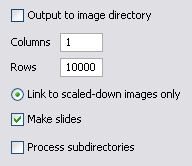
Do not check Output to image directory as this will result in a big mess.
The Image ordering is only important if you use the EOS template's section feature. More on that in part 2.
Do not change the Thumbnail layout! Leave it at 1x10000 to make sure that only one index file is being generated. You can set the number of rows and columns in the file settings.js (at the top).
Images Settings
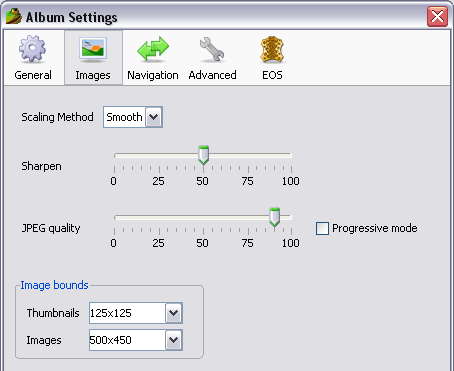
We highly recommend to set the Scaling Method to Smooth. The image quality is so much better.
The standard values for Sharpen (50) and JPEG quality (90) give very good results. Lower the quality settings if your image sizes are very large.
Feel free to to change the Image bounds (size in pixels) but keep in mind that your clients do not sit in front of a 1600x1200 pixel screen like you probably do. We do not recommend to set 120x120 as size for the thumbnails because this results in 120x90 sized images and some ad blocker software will suppress images with this size since it's a standard size of banner ads!
Navigation Settings
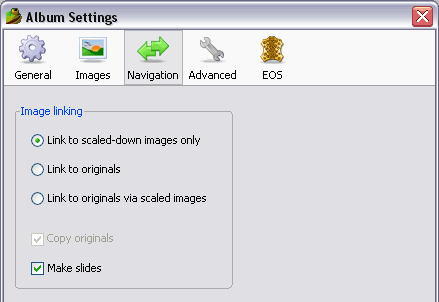
The Image linking must be set to "Link to scaled-down images only" and Make slides must be checked as shown in the screenshot above.
Advanced Settings
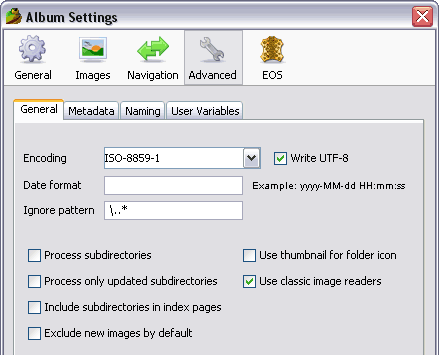
The advanced settings are separated into four tabs. The General tab has one important setting: make sure that Process subdirectories is unchecked! The EOS template does not work with multi-level source folders. Technically it is possible to generate galleries including subfolders but the cart won't be shared acroos them. Furthermore it requires a little tweak in the template files.
We recommend to check the option Use classic image readers because some people have reported that JAlbum hangs when it is unchecked.
With the Ignore pattern you could exclude special files or directories. Usually it is not needed. The standard pattern \..* means "all files or directories beginning with a dot".
The Metadata tab is explained in part 2. The Naming tag can be left at the default settings as shown below.
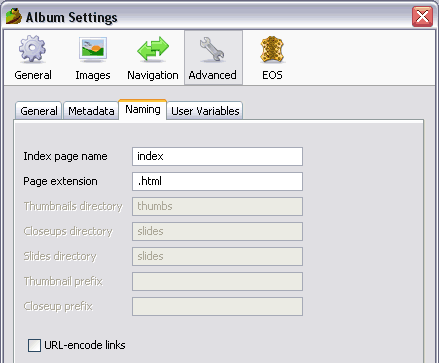
Here is a summary of the most important settings. Make sure you have everything correct:
EOS Settings
The EOS template has it's own tab in the settings window. It only shows up if you have selected the EOS skin in the main window.
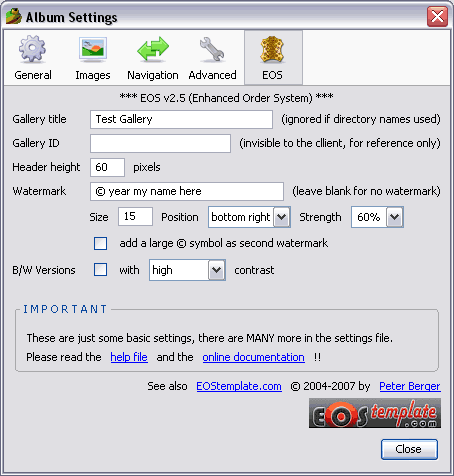
In the first line you can enter a Gallery title. It's also possible to use the input or the output folder name as title via the file settings.js. In that case this input field is ignored.
Underneath is an input field for a Gallery ID. That is an optional code which will appear in the order logfiles. It is invisible to your client but can be used to group your orders. One day you scroll through a list of your orders and might want to sort them by event date (for example). That's what this field is for.
Below you can set the Header height which is the size of the top frame in pixels. The value depends on the size of your logo image. If you use a logo with 60 pixels height you can leave that field untouched.
The Watermark text will be added to the web-sized image. It will appear as a semi-transparent text. You can set text size (in points), position and strength (0% = invisible, 100% = no transparency). The font type can be changed if you open the file "init.bsh" (in the EOS template folder) and scroll to the bottom where the watermark filter is defined.
In addition you can embed a large © symbol to your images. The default settings are 400 pixel size and 10% strength. That can only be changed in the file "init.bsh".
If you use an older version of the template you will see two checkbboxes for sharpening. Do not check these in JAlbum 7 as it will result in poor image quality. Since JAlbum 7 a scaleable sharpening method is available in the Images settings.
At last you can let JAlbum automatically create B/W Versions of your images! They will be stored in a subfolder named "bw" in the images folder. That comes very handy if you offer b/w prints of your images and let the client preview them. Check out the example gallery #4 to see the effect. Since many photographers enhance the contrast in b/w images for artistic reasons this function is also built in into JAlbum. Read the FAQ entry variations to learn how to show the b/w option in your gallery.
Hint:
You can change the default settings in the file "onload.bsh" in the EOS template folder.
Now go back to the main window and click on Make Album. The output directory will be created (if it does not exists) and the images resized. Once the process is finished click on View album.
What's next?
Locate your EOS project folder, named "galleries" in the example, and upload it to your website. If you place it in the top folder on your web server then you can access it with your browser using an address like this one:
http://www.mywebserver.com/galleries/event01
Note that the JAlbum Publish function does not take care of the "eoscommon" folder so it's recommended to manually transfer the files for your first gallery.
Once you got that far you can r e l a x . From now on we are able to support you over the web and clean up any mess you might have made during the customization process...
The next step is to explore the EOS settings file in the "eoscommon" folder and make some simple changes. Read the customization intro for more information. Reload the gallery in your browser to see your changes and you're right into the customization process. Note that there are some very helpful scripts in the "help" subfolder. It's also a good idea to have a look at the FAQ (only for clients). It's highly recommended that you read the first entries, marked with BEGINNER. It will save you a lot of time in case you have to deal with a script error.
Part 2 of the Getting Started article will show you more JAlbum related settings and how to control the EOS template with IPTC metadata.
Top
|