|
General
•
Installation
•
First Gallery
•
Part 2 »
General
The EOS HTML template can be used with BreezeBrowser (version 2.8 or higher) or BreezeBrowser Pro (any version). If you use BreezeBrowser or BreezeBrowser Pro version 1.4 (or lower) then please follow this link!
Before you start using the EOS template you should get comfortable with generating HTML galleries in BreezeBrowser. Read the help files (press "F1" in the application) or read them online.
If you have a specific question regarding the application itself (not EOS related) then please post to the BreezeSys support forum. It is monitored by the developer, Chris Breeze.
Installing the Template
The installation requires two steps and is very simple. All you have to do is to download two ZIP files and extract their content in the right place.
The files are named eos_common_v25.zip and eos_v25_bb.zip and can be downloaded from the Yahoo! group's Files section. It's important that their folder structure is still intact after the extraction!
Common Files
Now you have two folders named "galleries" and "EOS". The first one is your EOS project folder and can be moved to wherever you like. It only contains the "eoscommon" folder. Later it will be the place where all your web galleries reside. There is more information if you click the link above but it is not essential that you read it before you create your first gallery. Example setup:
C:\www\galleries\
Template Files
The next step is to install the "EOS" folder. Locate the BreezeBrowser installation directory and move the "EOS" folder into the subfolder templates. The next time you open the HTML window "EOS" will be part of the template selection menu. Example path:
C:\Program Files\BreezeSys\BreezeBrowserPro\templates\EOS\
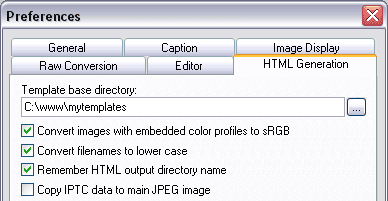
It is possible to define a custom template path in BreezeBrowser's preferences. If you did that then the installation directory is different to the example above! Go to File → Preferences... → HTML Generation and check the entry for the Template Base Directory. The screenshot below shows a custom template path in C:\www\mytemplates. In this case the "EOS" folder must be copied into that folder instead of the default one.

Note that you can rename the EOS folder without affecting it's functionality. That means you can install multiple versions of the EOS template if you like!
Template files are files which get scanned by the HTML generator. Tokens get replaced and rules will be applied to build a complete web gallery. There exists only one copy per template file in the template folder. However during the HTML generation process the image template gets applied to every image in your gallery, resulting in multiple image files (one per image) in the output folder.
Template
File Type
| File name in the
Template Folder
| File name(s) in
Output Folder
| Amount
|
| frame
| index_template.html
| index.html
| 1
|
| index
| index2_template.html
thumbnail_template.html
| index2.html
| 1
|
| image
| fullsize_template.html
| <image-name>.html
| one per
image
|
All other files in the EOS template folder (which are not listed in the table above) get copied unchanged to the output folder.
Your first Gallery
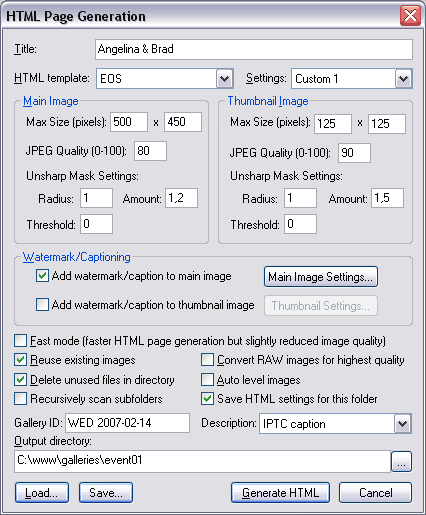
The installation is now completed and you can generate your first gallery. Select the images you would like to appear in the web gallery and then start the HTML Page Generation dialogue with Tools → HTML... or simply with Ctrl+h. A window similar to the one below will appear:

At the top you can enter the gallery title. Then choose "EOS" as your HTML template in the line below.
There are many other settings for your web gallery available in this window which are very well explained in the BreezeBrowser documentation. You can also read it online.
At the bottom of the HTML window there are two EOS specific input fields, named Gallery ID and Description. If you do not see these two input fields then you either have an old version of BreezeBrowser installed (you need version 2.8 or higher or the Pro version) or the "config" directory is missing from the EOS template folder. This "config" directory contains a file called "config.dat" which is responsible for showing these two options.
On the left side is Gallery ID. That is an optional code which will appear in the order logfiles. It is invisible to your client but can be used to group your orders. One day you scroll through a list of your orders and might want to sort them by event date (for example). That's what this field is for.
Note that this field should be empty by default. It may be possible that it contains some garbage code if you have used a different template before that offered a similar custom option. Delete the content in this case or the gallery might not work properly!

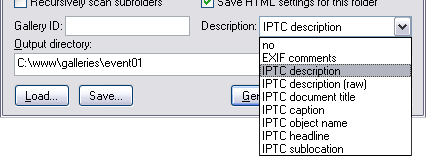
On the right side is Description. It defines the source field that is used as image caption. Note that IPTC caption is a legacy field name, it is the same as IPTC description in older BreezeBrowser versions. Same with IPTC object name which is now known as IPTC document title.
If you select IPTC description (raw) make sure that ther is no line break and no double quote in the text! Otherwise the page will not work. This setting can be used to include HTML code in the image caption, like a link to an external page.
The last input field in the HTML dialog window is the Output Directory (or destination folder). By default it is set to the image directory plus "HTML" - change that! It does not work with the shared folder setup of the EOS template. Instead enter your EOS project folder plus a gallery folder name of your choice. In our example that would be C:\www\galleries\event01.
In other words, "C:\www\galleries" is your EOS project path, where the "eoscommon" folder sits and all your web galleries as well.
Now click on Generate HTML and start the process. The output directory will be created (if it does not exists) and all files from the EOS template folder will be copied into it. The gallery will be shown in a new browser window.
What's next?
Locate your EOS project folder, named "galleries" in the example, and upload it to your website. If you place it in the top folder on your web server then you can access it with your browser using an address like this one:
http://www.mywebserver.com/galleries/event01
Once you got that far you can r e l a x . From now on we are able to support you over the web and clean up any mess you might have made during the customization process...
The next step is to explore the EOS settings file in the "eoscommon" folder and make some simple changes. Read the customization intro for more information. Reload the gallery in your browser to see your changes and you're right into the customization process. Note that there are some very helpful scripts in the "help" subfolder. It's also a good idea to have a look at the FAQ (only for clients). It's highly recommended that you read the first entries, marked with BEGINNER. It will save you a lot of time in case you have to deal with a script error.
Part 2 of the Getting Started article will show you how to control the EOS template with IPTC metadata.
Top
|